
1. Customise your event
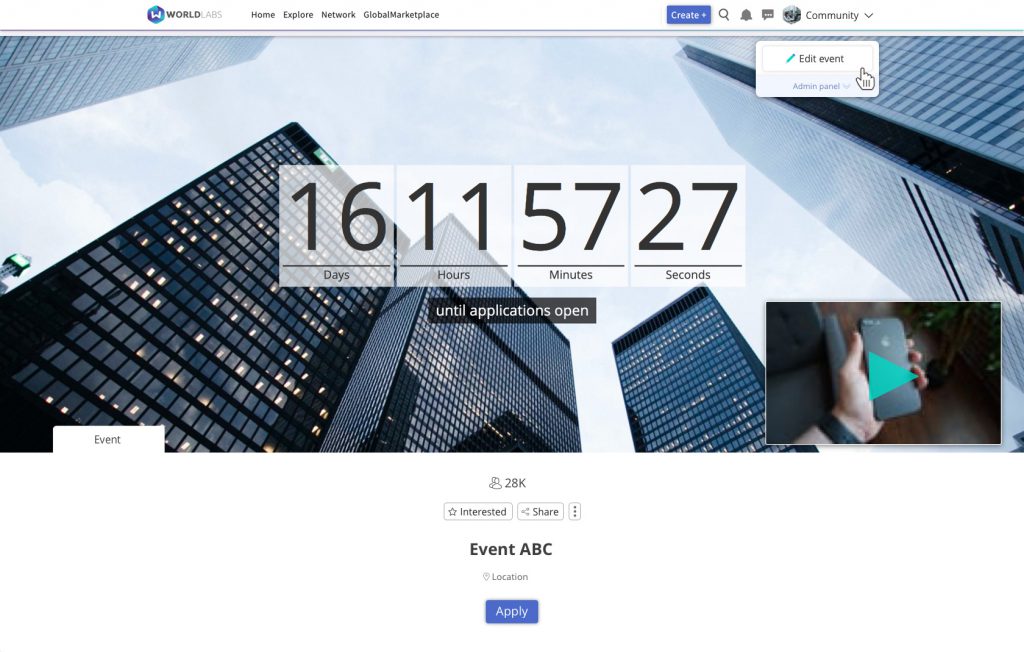
Once you are on your event page, click “Edit Event”, which appears beneath the fixed menu bar at the top right of your screen. This will open the edit form, which is split into the following categories:

- Basic info: from this tab, you can amend the event title and status you selected during the event creation process, add a description that will go beneath the event title at the top of the event page, and specify a location (if applicable).
- Settings and privacy: from this tab, you can:
- Specify whether anyone can apply for your event, or only members of your community.
- Choose whether you want to display a large countdown to your next deadline in the banner at the top of your event page.
- Determine whether the feed or the About section of your event should automatically open when someone visits your event page.
- Select who can start forum discussions.
- Assessment: from this tab, you can select whether you want to use WorldLabs’ in-built assessment tools to select attendees, link to third party assessment tools, or avoid using a selection process all together.
- Call-to-action buttons: from this tab, you can create and customise buttons that will then appear at the top of your event page. These buttons could, for example, link to the WorldLabs application portal (if you are using the WorldLabs attendee selection tools), a third party application portal, your main website or a ticketing website.
- Rewards: from this tab, you can provide details about the prizes or opportunities on offer for successful applicants.
- Key dates: from this tab, you can amend the dates you specified during the event creation process.
- About: from this tab, you can provide more detailed information about the event, including guidance relating to the selection process.
- Collapsible sections: from this tab, you can create a number of collapsible content boxes that will appear underneath the “About” box in the About section on your event page. For each section, you need to select a title and can also upload an image to accompany the content you include.
- Tags: from this tab, you can add tags to highlight any categories, subcategories, sectors and keywords that are relevant to your event. These tags will appear in the About section of your event page, under the “Tags” heading on the right-hand side.
- Video: from this tab, you can upload an introductory video, which will appear on top of your cover image at the top of your event page. You can also upload an unlimited number of additional videos to further promote your event. These videos will appear in the video gallery in the About section of your event page.
- Affiliations: from this tab, you can highlight any individuals or organisations that are affiliated or in some way involved with your event. These affiliations will then appear in a box on the right-hand side of the About section of your event page.
- Terms and conditions: in this tab, you can paste any of your own terms and conditions that you wish to govern your event and any connected attendee selection process. Prospective attendees will be able to view these terms and conditions – and will be required to tick a box to signify their agreement to them – before submitting their applications.